After years of experimenting, I finally found an overnight sourdough bread recipe that even the self-proclaimed sourdough haters in my house can’t resist!
Because you let the dough ferment in the refrigerator overnight, it has a much milder flavor than all the other sourdough recipes I’ve tried.
Of course, if you are a fan of really tangy sourdough loaf, you can let it sit in a warm place for a few hours before placing it in the refrigerator. This will speed up the fermentation process.

EASY SOURDOUGH BREAD RECIPE
I always assumed that making sourdough bread was time consuming and extremely challenging, so I never attempted it at home. I was wrong. Mostly. While making sourdough bread does take a fair amount of time, most of that time is hands off. And it definitely isn’t challenging!
Sourdough starter is the key to that tangy flavor as well as the rise. You can make your own starter, or even buy it. If you’re lucky, you can get it from a friend, which is what I did.
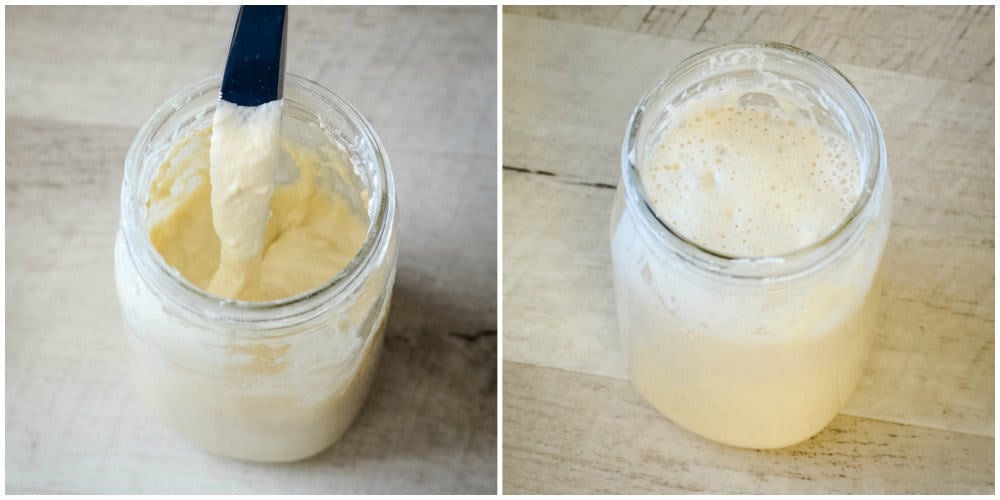
Before you begin, you want to make sure that your sourdough start is nice and bubbly. Mine is usually about the consistency of muffin batter before it rises (photo on the left), but yours may be more runny, or even thicker.

What matters is that it is active and bubbly when you’re ready to bake (like the photo on the right). To make sure it’s ready, do the float test. Drop a spoonful of starter in a glass of water. If it rises to the top, it’s ready for baking!
Overnight Sourdough Bread Recipe Instructions
- ACTIVE STARTER – For successful sourdough bread, you must use active, bubbly starter. It should be full of bubbles. The easiest way to tell if it is ready is to put a spoonful into a cup of water. If it rises to the top, it’s ready. If it sinks, the start needs to sit longer or be fed again.
- DOUGH – Mix together the sourdough start, warm water, salt, and about 2 cups of the flour in a large mixing bowl with a wooden spoon. Stir briskly until smooth, then stir in the rest of the flour. It should start to pull away from the sides of the bowl, but still be sticky.
- AUTOLYSE – This is the process of letting the dough sit so that the flour absorbs the water. Cover your bowl with a lid or plastic wrap and let it sit at room temp for about 30 minutes.
- STRETCH & FOLD – Take one side of the dough and fold it across the ball of dough. Turn the bowl and repeat at least 4 times. Cover again and let sit 30 minutes. Repeat this process at least two times, but up to four.
- COLD FERMENT – When the dough is very smooth and stretchy after being folded several times, gently form it into a ball in the bowl. Cover and refrigerate overnight, or for at least 12 hours.
- SHAPE – The next day, let the dough sit at room temperature for an hour or two, then form it into a ball. Place the ball smooth side up on a piece of parchment paper. Use a bread lame, sharp knife, or razor blade to cut slits in the top for the steam to escape.
- PREHEAT OVEN – Preheat your oven and pot to 450 degrees.
- BAKE – Use the parchment paper to transfer the bread into the hot dutch oven. If desired, drop a few ice cubes between the parchment and the side of the pan. Add the lid and place the pot in the hot oven. Bake at 450° for about 35 minutes. Remove the lid and cook for another 10-20 minutes, or until the crust is as dark as you want it. We like a golden brown crust.
- COOL – Use the parchment paper to transfer the bread from the pot to a wire rack. Let it cool at least 20 minutes. It does taste amazing warm, but it slices more cleanly after it has cooled for an hour.

You can store leftover bread in a plastic bag at room temperature for up to a week. Just let it cool first so it doesn’t sweat in the bag and get a soggy crust.
It can also be stored in the freezer for 3 months. Wrap it in plastic wrap, then place it in a heavy-duty freezer bag.
FAQ
How can I make my sourdough more sour?
This recipe yields a very mild loaf that even small kids love. For a more tangy loaf, let the dough sit for 3-5 hours at room temperature before placing it in the refrigerator overnight. The longer it ferments at room temperature, the more sour it will become.
Do I have to use a Dutch Oven?
You will definitely get the best texture and rise using a pot with a lid because it traps the steam as the bread bakes. The sides of the pot also force the bread to rise taller.
If you don’t have a heavy oven-safe pot, you can bake the bread on a cookie sheet. Just keep in mind that it will be wider and more flat because it will spread instead of rising straight up.
Try this trick — Heat a metal loaf pan on the bottom rack of your oven as it preheats, and bring 3 cups of water to a boil. When your oven is hot, pour the boiling water into the loaf pan and quickly place your loaf in the oven on the rack above.
This will help recreate the steam that you get when you use a Dutch oven. Keep the oven door closed until your bread is done so the steam doesn’t escape!
Do I have to heat my Dutch oven?
I forgot to heat my pan one time, and I was surprised at the difference it made using a cold pot. The bread didn’t rise up nearly as tall, and I had to add almost 15 minutes to the baking time.
So yes, for the best results you want to heat that pot!
How do I avoid large air pockets in my bread?
Some people love the large bubbles in sourdough bread, but I don’t like it when my butter and jam fall through the holes!
To get rid of them, when you form your loaf in the morning, give it a few hard slaps as you are shaping it. This will pop the air bubbles.
Of course, if you like the air pockets and extra chewy texture, simply use a very light touch when forming your loaf.

MORE BREAD RECIPES:
- Easy Naan Bread Recipe
- Macaroni Grill Bread Recipe
- Homemade Hamburger Buns
- One Hour Cinnamon Rolls
- Homemade French Bread
- Oatmeal Bread Recipe
Overnight Sourdough Bread Recipe

This foolproof artisan sourdough bread has a mild flavor, and yields a soft and chewy loaf. It's great on its own, toasted, or made into sandwiches.
Ingredients
- 1 cup active sourdough starter
- 1 1/2 cups warm water
- 2 tsp salt
- 4 cups bread flour
Instructions
- Test your sourdough starter by placing a small spoonful in a glass of water. If it floats to the top, it's ready.
- In a large bowl, mix together the sourdough start, warm water, salt, and half of the flour. Stir until smooth.
- Add the remaining flour and stir until the dough starts to pull away from the sides of the bowl.
- Cover with plastic wrap or a lid and let sit at room temperature for 30 minutes. Fold one corner of the dough over to the other side. Rotate the bowl a quarter turn and fold over each of the corners.
- Repeat 3-5 times. The bread dough will become much more smooth and elastic after it has rested and been stretched a few times. (Tip - if the dough seems too wet, flour your hands before folding & stretching the dough. If it seems too dry, wet your hands with water.)
- Form the dough into a ball shape in the bowl and cover with plastic wrap or a lid. Refrigerate for at least 12 hours, but up to 24.
- The next morning, take the dough out of the refrigerator and let it sit at room temperature for 1-3 hours. Form it into a ball by tucking the ends under and forming a smooth top.
- Place the dough ball on a piece of parchment paper. Cut slits in the top of the dough. Preheat your oven and a 4-quart Dutch oven to 450°.
- Grab the edges of the parchment and gently place the parchment and dough into the hot pan. If desired, slip a couple of ice cubes between the parchment and pan. (This gives the bread a nicer rice and chewier texture.)
- Place the lid on the pan and bake for 35-40 minutes at 450 degrees.
- Take the lid off the pan. The bread should have risen to almost the top of the pan, and be barely golden brown.
- Continue baking for 10-20 more minutes, or until internal temperature is 200° and the crust is as brown as you like it.
- Grab the edges of the parchment to remove the bread. Place it on a cooling rack. Let it cool for at least 20 minutes, but it slices easier after it has completely cooled.
Notes
If you don't have bread flour, you can use 1/4 cup of vital wheat gluten and 3 3/4 cups of all-purpose flour. But even if you just use all purpose flour, it will still be mighty tasty.
Recommended Products
As an Amazon Associate and member of other affiliate programs, I earn a small amount from your purchase, no cost to you.
Nutrition Information:
Yield:
8Serving Size:
1Amount Per Serving: Calories: 301Total Fat: 1gSaturated Fat: 0gTrans Fat: 0gUnsaturated Fat: 1gCholesterol: 0mgSodium: 585mgCarbohydrates: 61gFiber: 3gSugar: 0gProtein: 10g
It’s easier than you think to make delicious sourdough bread at home for a fraction of the cost of store-bought. Your first loaf of sourdough bread may not turn out perfect, but keep trying! In no time, you will be a pro!


Leave a Reply