I have a confession. I have only purchased one premade Halloween costume in my entire life. Partly because I can’t part with all that cash, and partly because have a crazy love of making creative Halloween costumes. I am always on the lookout for clever costume ideas. This year was no exception.
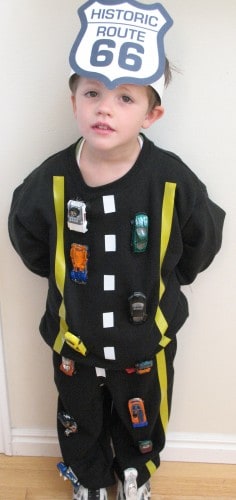
My four year old LOVES cars. I found this idea on the Internet and decided I could make one myself. I kind of procrastinated, so it was good that it all came together in about 90 minutes. I finished it just as he needed to leave for his preschool Halloween party. Whew! I would recommend starting it a week before Halloween, not two hours before your child needs to wear it. But that is just my suggestion, you can feel free to stress out like I did.
Here is a picture of him wearing the costume:

Instructions:
Supplies: black sweat pants, black sweatshirt, yellow and white electrical tape, cars, adhesive velcro or black thread and needle, Route 66 sign printed off the internet on white cardstock, a strip of poster board for the headband
Notes: I got the sweat pants and sweatshirt at Walmart for $5 each. The electrical tape (also at Walmart) came in a pack of 5 colors and was around $2.50.
1-Lay the sweatshirt and pants out flat on a table or countertop. Attach long strips of yellow tape down the sides of the shirt and pants to form the outer edge of the highway. Make sure that the bottom of the tape on the shirt lines up with the top of the tape on the pants so your highway will be straight once the costume is on.
2- Cut short strips of white tape and attach them down the middle of the highway.
3-Attach the cars. Adhesive velcro is the easiest way to do this. However, I wanted to be able to re-use the clothes, so I opted for another method. I sewed them on. It was a little tricky with some of the cars, but not too bad.
POST HALLOWEEN UPDATE: Sewing the cars on didn’t work very well. First of all, some of the stitches pulled loose with the weight of the cars. Second of all, when I tried to remove the cars because my son wanted to play with them, the duct tape I used to position them left a residue. The only reason I sewed them on was so I could re-use them. So I would definitely recommend just using the adhesive velcro. (And if you do happen to try this, please leave a comment and let us know how it worked.)
4-Print a road sign off the internet (there are a lot to choose from) on white cardstock. Cut it out.
5-Cut a strip of posterboard about 1 1/2″ wide. Wrap it around your child’s head and cut it to the right length. Tape or staple it together to make a headband. Attach the road sign to the front of the headband.
You are finished! You have an adorable handmade costume and it took less than 2 hours. Hooray for you!

Leave a Reply